~ 7 min read
Unlock the Power of AI: Crafting a Python Desktop Chatbot App with GPT-4 - A Comprehensive Guide
In today's fast-paced digital world, businesses and individuals alike are constantly looking for innovative ways to enhance user experience and streamline communication. Enter the realm of AI-powered chatbots, revolutionizing the way we interact with technology. With the cutting-edge GPT-4 model at your disposal, creating your own Python desktop chatbot application has never been easier or more effective. In this comprehensive guide, we'll walk you through the entire process, from setting up the GPT-4 API to building a seamless user interface using the popular tkinter library.
Creating A New Python Project With Virtual Environment
In order to start creating a new Python project start with creating a new project folder:
mkdir chatbot-gpt4
cd chatbot-gpt4
Next, create a new Python virtual environment:
python3 -m venv envThe command python3 -m venv env creates a new virtual environment named env using the Python 3 venv module.
Here's a breakdown of the command:
python3: This specifies that the command should use Python 3 as the interpreter.-m venv: This flag indicates that the command should run the built-in venv module, which is used for creating virtual environments.env: This is the name of the virtual environment you want to create. In this case, the virtual environment will be namedenv.
A virtual environment is an isolated Python environment that allows you to install packages and dependencies specific to a particular project, without interfering with your system-wide Python installation or other projects. This isolation helps maintain consistency and avoid potential conflicts between different project requirements.
Once the virtual environment is created, you can activate it using the following command:
source env/bin/activateImplement The Python Chatbot
Now let's create a new empty Python file which we'll use to implement the chatbot application:
touch chatbot.pyStep 1: Import Required Libraries
Begin by importing the necessary libraries for our chatbot application. We'll need the os, openai, tkinter, and tkinter.ttk libraries to create the user interface and interact with the GPT-4 API.
import os
import openai
import tkinter as tk
from tkinter import ttk
Step 2: Set up the OpenAI API Key
Next, set up your OpenAI API key by retrieving it from your environment variables. Replace your_api_key_here with your actual API key.
openai.api_key = os.getenv("OPENAI_API_KEY")Step 3: Define the send_message() Function
Create a function called send_message() that will be called when the user clicks the "Send" button. This function will handle sending the user's message to the GPT-4 API and displaying the assistant's response.
def send_message():
    # ... (code will be described in the next steps)
Step 4: Get User Input and Update the Conversation
Inside the send_message() function, retrieve the user's input, display it in the conversation text box, and then clear the input field.
message = user_input.get()
conversation.insert(tk.END, "You: " + message + "\n")
user_input.delete(0, tk.END
Step 5: Send the User Input to GPT-4 API and Get the Assistant's Response
Still within the send_message() function, call the GPT-4 API with the user's message and the context of the conversation so far. The context is maintained by appending previous user inputs and assistant responses to the messages array.
response = openai.ChatCompletion.create(
    model="gpt-4",
    messages=[
        {"role": "system", "content": "You are a helpful assistant."},
        *previous_messages,
        {"role": "user", "content": message},
    ]
)

assistant_response = response.choices[0].message["content"]
Step 6: Display the Assistant's Response in the Conversation
Insert the assistant's response into the conversation text box, ensuring that the assistant's messages are displayed in bold.
conversation.insert(tk.END, "Assistant: ", "bold")
conversation.insert(tk.END, assistant_response + "\n")
Step 7: Update the Conversation History
Update the list of previous messages with the user's input and the assistant's response.
previous_messages.extend([
    {"role": "user", "content": message},
    {"role": "assistant", "content": assistant_response},
])
Step 8: Set up the User Interface with tkinter
Now, it's time to create the user interface for our chatbot application using the tkinter library. First, initialize the main window and set its title.
root = tk.Tk()
root.title("Chatbot")
Step 9: Create a Frame for the Chatbot Interface
Add a frame to the main window that will hold the conversation text box, user input field, and send button. Apply padding to the frame for better visual appearance.
frame = ttk.Frame(root, padding="10")
frame.grid(row=0, column=0, sticky=(tk.W, tk.E, tk.N, tk.S))
Step 10: Set up the Conversation Text Box
Create a text box for displaying the conversation, configure the text widget to display the assistant's messages in bold, and set the font size to 12.
conversation = tk.Text(frame, wrap=tk.WORD, width=75, height=20, font=("TkDefaultFont", 12))
conversation.tag_configure("bold", font=("TkDefaultFont", 12, "bold"))
conversation.grid(row=0, column=0, columnspan=2, sticky=(tk.W, tk.E, tk.N, tk.S))
Step 11: Add the User Input Field
Create an input field for the user to enter their messages, and set the font size to 12.
user_input = ttk.Entry(frame, width=70, font=("TkDefaultFont", 12))
user_input.grid(row=1, column=0, sticky=(tk.W, tk.E, tk.N, tk.S))
Step 12: Create the Send Button
Add a "Send" button to the frame, which will call the send_message() function when clicked.
send_button = ttk.Button(frame, text="Send", command=send_message)
send_button.grid(row=1, column=1, sticky=(tk.W, tk.E, tk.N, tk.S))
Step 13: Initialize the Conversation History
Initialize an empty list called previous_messages that will store the conversation history.
previous_messages = []Step 14: Run the Chatbot Application
Finally, start the main event loop of the chatbot application.
root.mainloop()Complete Code
Finally take a look at the complete code which is now available in chatbot.py:
import os
import openai
import tkinter as tk
from tkinter import ttk

openai.api_key = os.getenv("OPENAI_API_KEY")

def send_message():
    message = user_input.get()
    conversation.insert(tk.END, "You: " + message + "\n")
    user_input.delete(0, tk.END)

    response = openai.ChatCompletion.create(
        model="gpt-4",
        messages=[
            {"role": "system", "content": "You are a helpful assistant."},
            *previous_messages,
            {"role": "user", "content": message},
        ]
    )

    assistant_response = response.choices[0].message["content"]
    conversation.insert(tk.END, "Assistant: ", "bold")
    conversation.insert(tk.END, assistant_response + "\n")

    previous_messages.extend([
        {"role": "user", "content": message},
        {"role": "assistant", "content": assistant_response},
    ])

root = tk.Tk()
root.title("Chatbot")

frame = ttk.Frame(root, padding="10")
frame.grid(row=0, column=0, sticky=(tk.W, tk.E, tk.N, tk.S))

conversation = tk.Text(frame, wrap=tk.WORD, width=75, height=20, font=("TkDefaultFont", 12))
conversation.tag_configure("bold", font=("TkDefaultFont", 12, "bold"))
conversation.grid(row=0, column=0, columnspan=2, sticky=(tk.W, tk.E, tk.N, tk.S))

user_input = ttk.Entry(frame, width=70, font=("TkDefaultFont", 12))
user_input.grid(row=1, column=0, sticky=(tk.W, tk.E, tk.N, tk.S))

send_button = ttk.Button(frame, text="Send", command=send_message)
send_button.grid(row=1, column=1, sticky=(tk.W, tk.E, tk.N, tk.S))

previous_messages = []

root.mainloop()
Run The Chatbot Application
Now, that everything is implement we're ready to start the Python desktop application. First you need to set the Open AI API key as an environment variable:
export OPENAI_API_KEY=your_api_key_hereTo retrieve your OpenAI API key, follow these steps:
Step 1: Sign up or log in to your OpenAI account
- Visit the OpenAI website (https://www.openai.com/) and sign up for an account if you don't have one already. If you already have an account, log in.
Step 2: Access the API key
- After logging in, navigate to the API section (https://platform.openai.com/signup) or click on your profile icon in the top right corner, and select "API keys" from the dropdown menu.
Step 3: Locate and copy the API key
- On the API keys page, you will see a table with your API keys. Find the key you want to use (usually labeled as "Secret key") and click on the "Show" button to reveal the key. Copy the key to your clipboard.
With the OpenAI API key set, you can now start the Python chatbot application by using the following command:
python chatbot.pyThe application is then launched in a new desktop window:
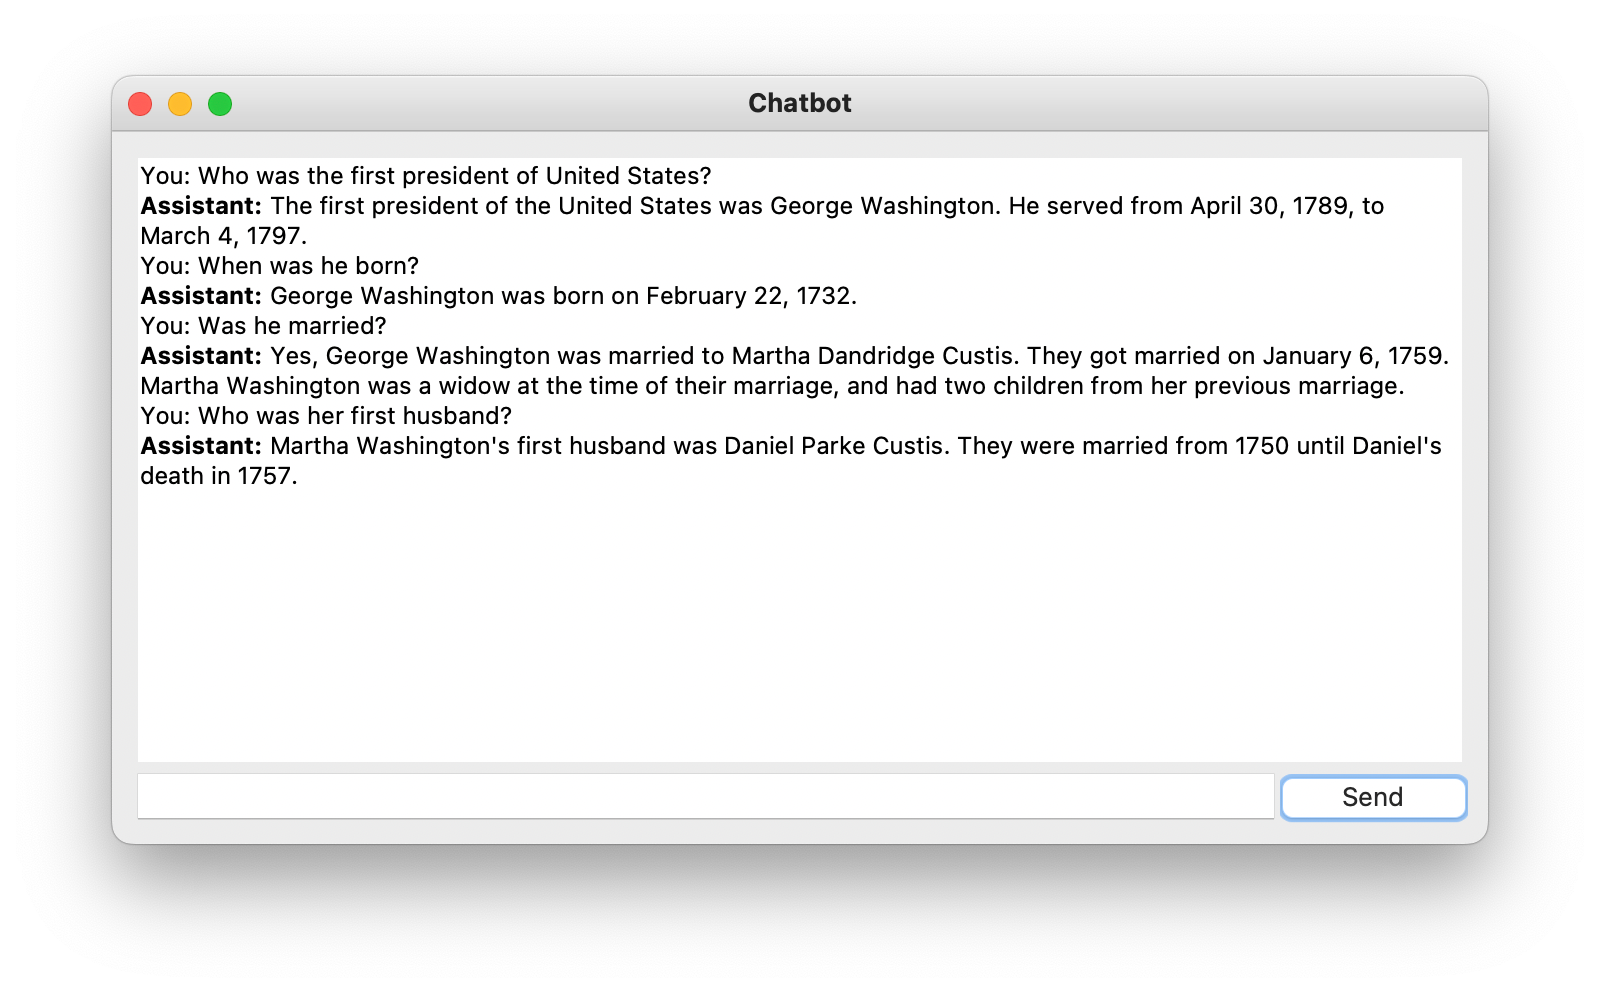
Using the text input field at the bottom you can type in messages, questions, or instructions which you can send to the GPT-4 model by clicking on button "Send". Once a response is received the text is displayed as a response from "Assistant".
Please also note, that this chatbot is context aware, which means that the information from the conversation before is taking into consideration when generating the next response.
Conclusion
The power of AI-driven chatbots is truly reshaping the landscape of communication and user engagement. By following this comprehensive guide, you've successfully embarked on your journey into the world of AI and developed a Python desktop chatbot application leveraging the remarkable capabilities of GPT-4. As you continue to refine and enhance your chatbot, remember that the possibilities are endless, and the potential impact on your business or personal projects is immense. By staying abreast of advancements in AI and chatbot technology, you'll be well-equipped to adapt and thrive in an ever-evolving digital landscape.