~ 11 min read
Building A Svelte 3 Todo App From Start To Deployment
In the previous Svelte 3 Quickstart Tutorial we've covered the framework basics. Now it's time to go one step further and apply this knowledge to build a complete Svelte 3 todo application from start to finish.
Before getting started, let's first take a look at the application we're going to build in this tutorial. The start page of the web application will look like the following:
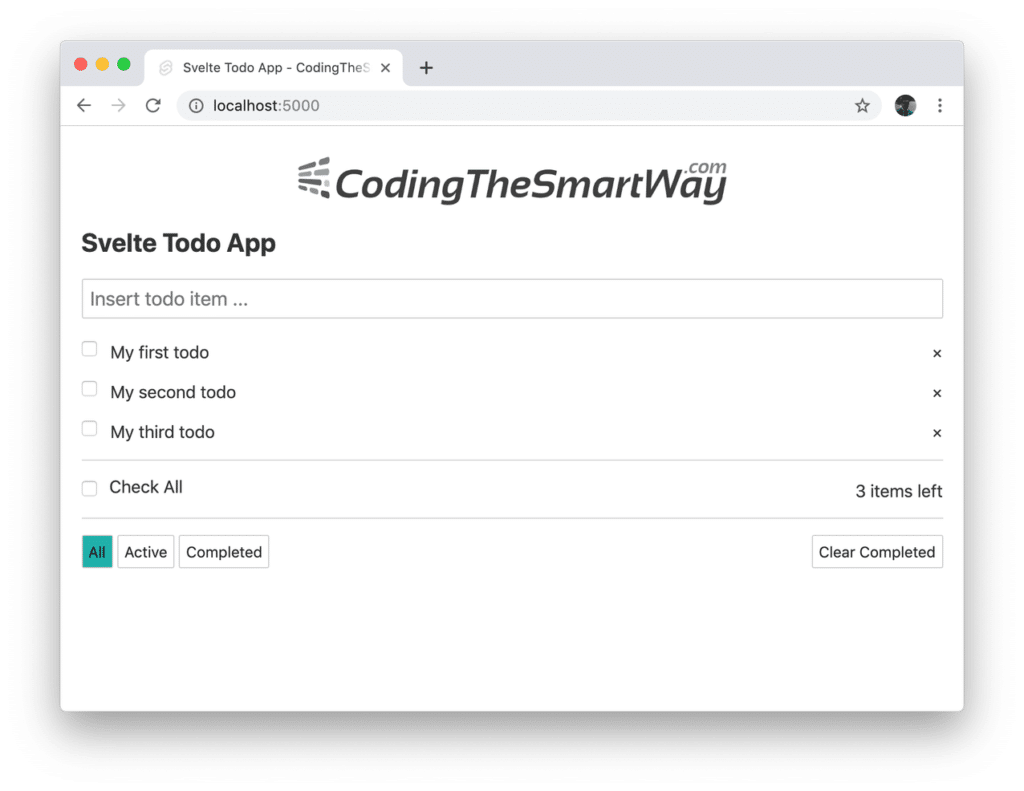
The user is presented with a list of todo items. Adding new todo items is possible by typing in the text in the input fields:
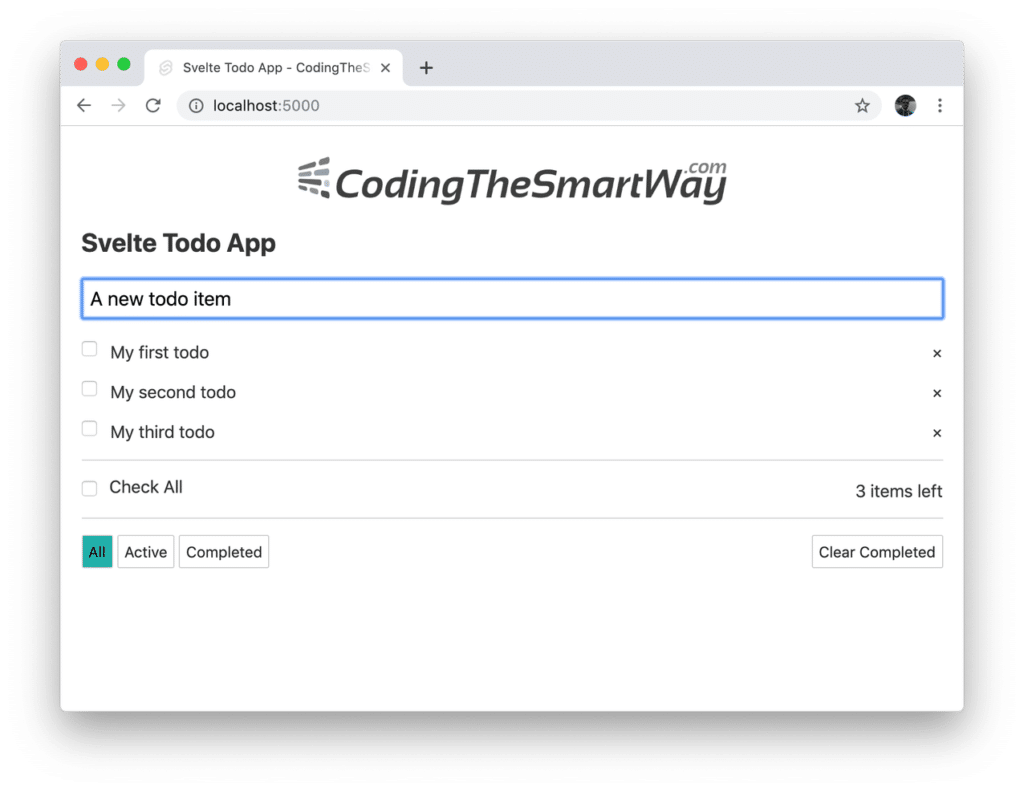
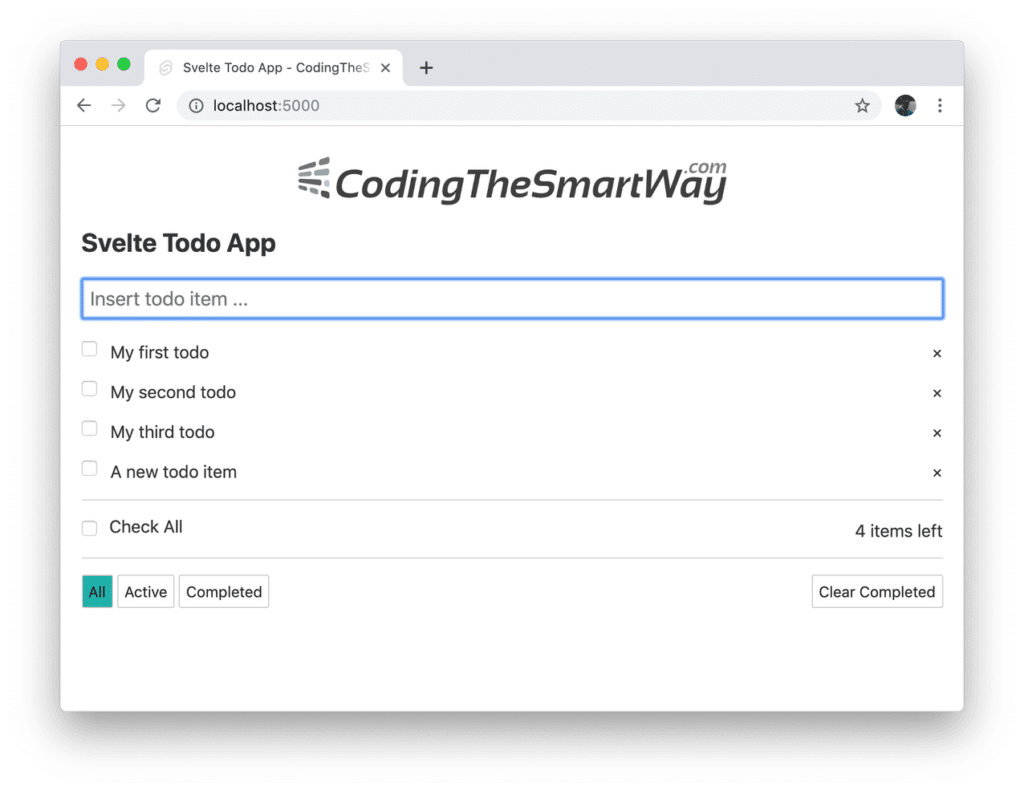
And afterwards hitting the Enter key to add the new item to the list as you can see in the following screenshot:
Each of the todo items has a checkbox in front of the todo text information. The checkbox can be used to toggle the completed state of each todo item. If a todo item is marked as completed by activating the checkbox the corresponding todo text is crossed out:
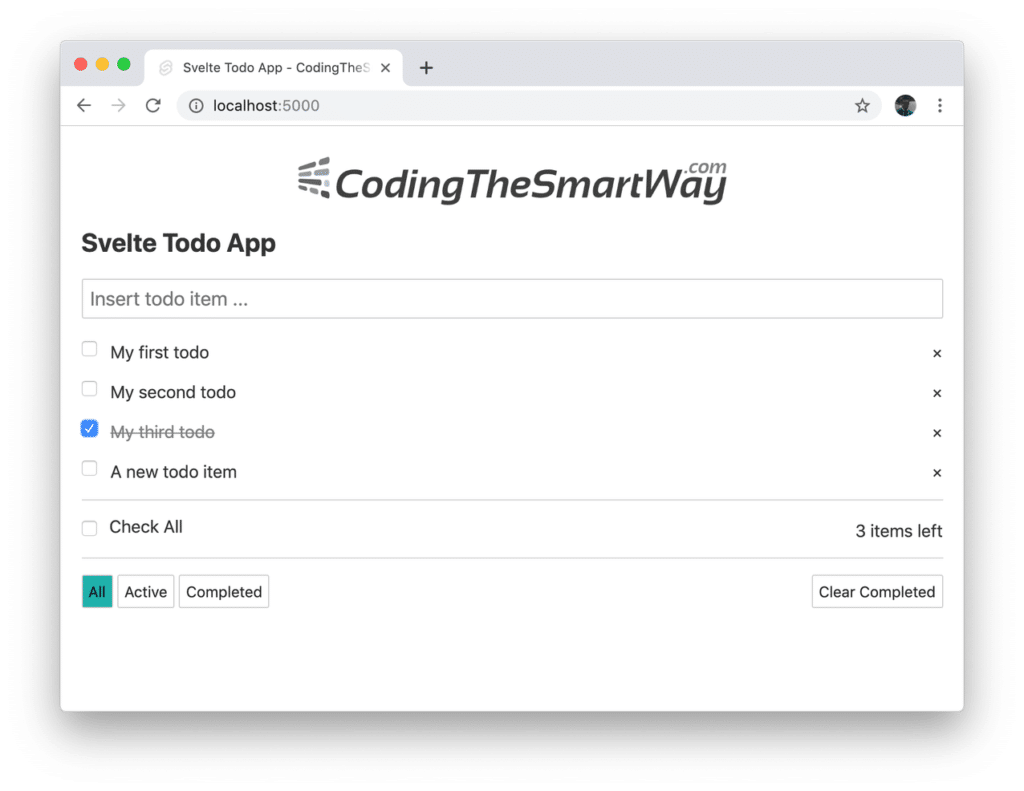
Furthermore the number of active todo items which is printed out (3 items left) is updated automatically.
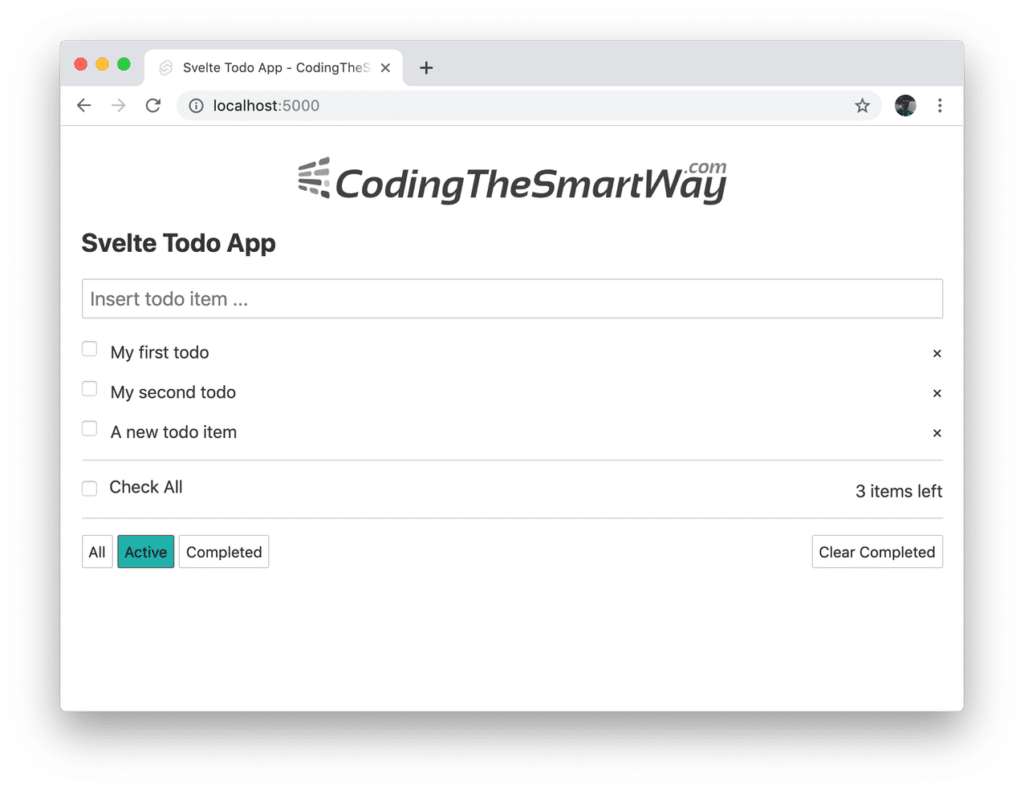
The user will also be able to apply filters to the list of to items by using the three buttons at the bottom left. E.g. clicking on the button Active will apply a filter to the list which is only displaying todo items which are not in completed state:
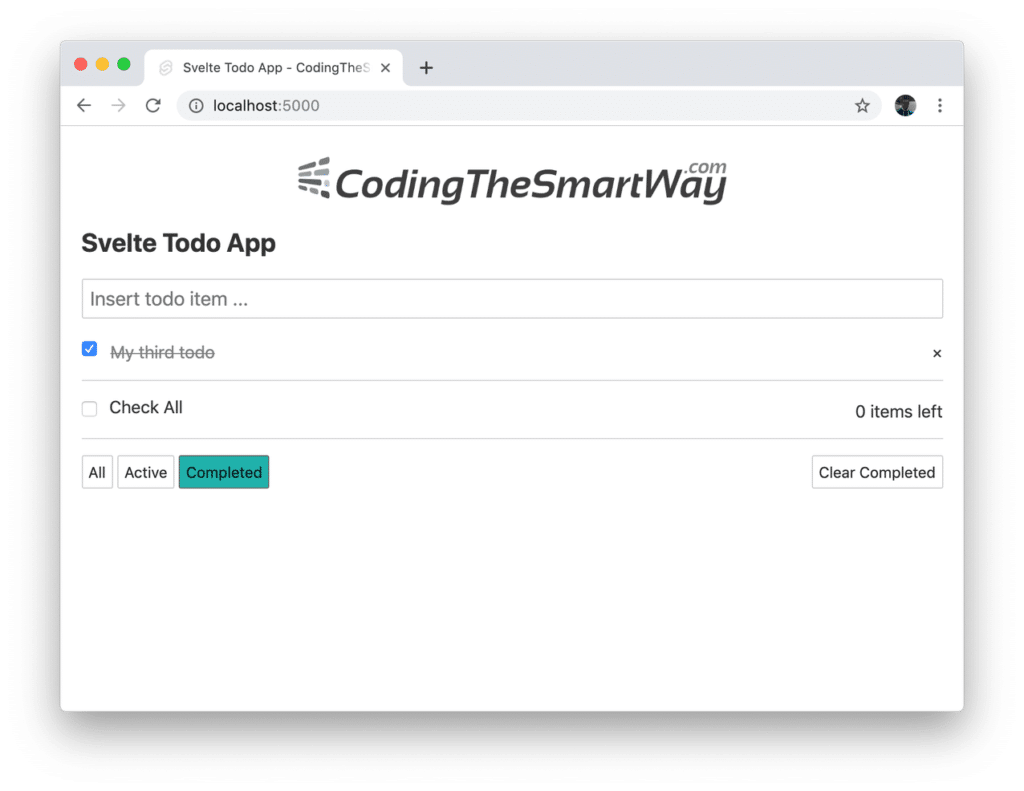
In contrast to that you can use the button Completed to apply a filter which is only displaying todo items which are in completed state already:
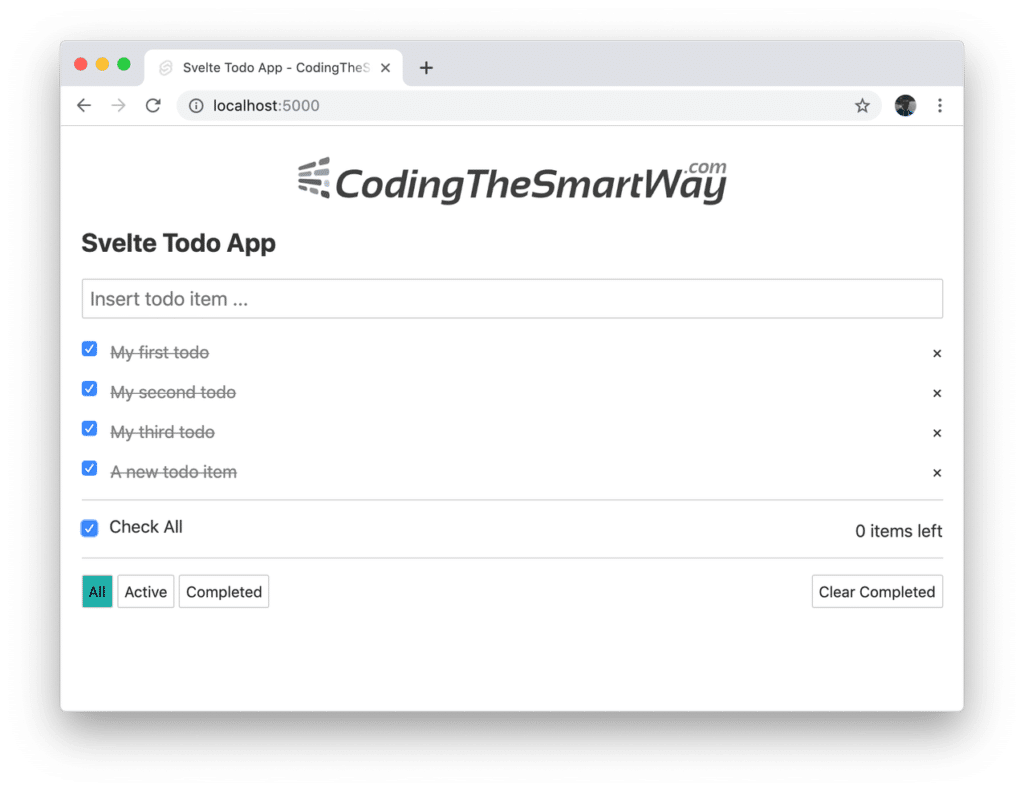
By clicking on the checkbox Check All it is possible to set all todo items to completed at once:
The application provides you with two options to delete todo items from the list:
- Use the x icon on the right side to delete single todo items from the list
- Use button Clear Completed to remove all todo items which are in completed state right now at once
Now that you have seen a first glimpse of what the final application will look like, let's get into the process of implementing it step by step by using Svelte 3 ...
Setting Up The Project
First step is to setup the project. This is done by executing the following three commands:
$ npx degit sveltejs/template svelte-todo
$ cd svelte-todo
$ npm install
Having run through those commands the default Svelte project template has been downloaded to the new folder svelte-todo and all needed development dependencies have been installed into the node_modules subfolder.
Preparing Svelte Components
The todo application we're going to build will consist of two Svelte components: Todos component and TodoItem component. Therefore we're going to add the following two files in the src folder of the project:
- Todos.svelte
- TodoItem.svelte
Having added these two files to the project we're ready to start implementing both components step by step.
Setting Up Local Data
Let's start in file Todos.svelte. First we need to add a script section and within that section add some sample data:
<script>
    let todos = [
        {
            id: 1,
            title: 'My first todo',
            completed: false
        },
        {
            id: 2,
            title: 'My second todo',
            completed: false
        },
        {
            id: 3,
            title: 'My third todo',
            completed: false
        },
    ];
</script>
Here you can see that an array is defined consisting of three todo item objects each consisting of the following properties:
- id: unique numeric ID of todo item
- title: text string describing the todo item
- completed: boolean value, specifying if the todo item is in completed state (=true) or not (=false)
Furthermore we're also adding the following import statement on top the script section:
import TodoItem from './TodoItem.svelte';This is importing TodoItem component from TodoItem.svelte. This is needed because TodoItem component will be included in the template of Todo component later on.
To further complete the script section add the following three variable definitions on top as well:
let newTodoTitle ='';
let currentFilter = 'all';
let nextId = 4;
Adding Template Code For Todos Component
In the next step let's add the template code into file Todos.svelte:
<div class="container">

    <a href="https://codingthesmartway.com" target="_blank"><img src={'/img/CTSWLogo.png'} alt="svelte logo" class="logo"></a>

    <h2>Svelte Todo App</h2>
    <input type="text" class="todo-input" placeholder="Insert todo item ..." bind:value={newTodoTitle} on:keydown={addTodo}>

    {#each filteredTodos as todo}
        <div class="todo-item">
            <TodoItem {...todo} on:deleteTodo={handleDeleteTodo} on:toggleComplete={handleToggleComplete} />
        </div>
    {/each}

    <div class="inner-container">
        <div><label><input class="inner-container-input" type="checkbox" on:change={checkAllTodos}>Check All</label></div>
        <div>{todosRemaining} items left</div>
    </div>

    <div class="inner-container">
        <div>
            <button on:click={() => updateFilter('all')} class:active="{currentFilter === 'all'}">All</button>
            <button on:click={() => updateFilter('active')} class:active="{currentFilter === 'active'}">Active</button>
            <button on:click={() => updateFilter('completed')} class:active="{currentFilter === 'completed'}">Completed</button>
        </div>

        <div>
            <button on:click={clearCompleted}>Clear Completed</button>
        </div>
    </div>

</div>
First thing to notice is that the template contains an input element on top which lets the user add new todo items. Therefore the value property of this element is bound to newTodoTitle and the addTodo function (to be implemented in the next step) is added as an event handler to the keydown event.
An {#each filteredTodos as todo} ... {/each} block is used to iterate through the array of filtered todos (which will be implemented as a computed property filteredTodos later on). Inside this block the current todo item is outputted by using the TodoItem component:
<TodoItem {...todo} on:deleteTodo={handleDeleteTodo} on:toggleComplete={handleToggleComplete} />By using the spread operator {...todo} we're making sure that every single todo property (id, completed, title) is passed to TodoItem is a component property. Futhermore event handlers are registered for the deleteTodo and the toggleComplete event.
In addition the Check All checkbox is added to the template. The change event of this checkbox is bound to the event handler funktion checkAllTodos. This function will be added in the next steps to the implementation of Todos component and will contain the code which is needed to set all todo items to state completed at once.
The total number of non-completed todo elements is output by using the computed property todosRemaining. This computed property will also be added to the implementation in the following steps.
Finally you'll find HTML code outputting three buttons in order to let the user apply filter settings (all, active, and completed). Furthermore there is a fourth button included to clear (remove) all todo items which are already marked as completed at once.
Adding The addTodo Event Handler
Let's further complete the script section in Todos.svelte by first adding the implementation of the addTodo event handler function:
function addTodo(event) {
    if (event.key === 'Enter') {
        todos = [...todos, {
            id: nextId,
            completed: false,
            title: newTodoTitle
        }];

        nextId = nextId + 1;
        newTodoTitle = '';
    }
}
As a parameter the function received the event object. We're able to use this object to check for the exact key which has been pressed by using event.key. If event.key is equal to the string Enter we know that the enter key has been pressed and that we're ready to proceed with adding a new todo object to the todos array.
Adding Computed Properties todosRemaining and filteredTodos
By taking a closer look at the component's template code we've already figured out that two computed properties needs to be implemented:
- todosRemaining: This computed property is updating automatically everytime the total number of non-completed todo item changes.
- filteredTodos: This computed property contains the filtered todo items as an array and is updated everytime the user changes the filter value automatically.
The following lines of code needs to be added:
$: todosRemaining = filteredTodos.filter(todo => !todo.completed).length;
$: filteredTodos = currentFilter === 'all' ? todos : currentFilter === 'completed'
    ? todos.filter(todo => todo.completed)
    : todos.filter(todo => !todo.completed)
Adding checkAllTodos Event Handler
Next, let's also add the implementation of function checkAllTodos which we've attached as an event handler to the change event of the checkbox input element which is used to mark all todo items as completed:
function checkAllTodos(event) {
    todos.forEach(todo => todo.completed = event.target.checked);
    todos = todos;
}
Adding updateFilter Event Handler
The implementation of the updateFilter function is quite simple as you can see in the following listing:
function updateFilter(newFilter) {
    currentFilter = newFilter;
}
As a parameter this function is taking the newFilter value and the setting variable currentFilter to this new value. Because currentFilter is used in the filteredTodos computed property, the value of the computed property is updated automatically due to reactivity in Svelte.
Adding clearCompleted Event Handler
The clearCompleted function is also very simple and implemented with only three lines of code:
function clearCompleted() {
    todos = todos.filter(todo => !todo.completed);
}
The purpose of this function is to remove all todo items with status completed from the todos array.
Handling TodoItem Component Events
Now that we have added implementation for all the internal event handler functions we also need to fruther complete the implementation by adding two more event handler functions to also handle events coming from the child component TodoItem: handleDeleteTodod and handleToggleComplete.
function handleDeleteTodo(event) {
    todos = todos.filter(todo => todo.id !== event.detail.id);
}

function handleToggleComplete(event) {
    const todoIndex = todos.findIndex(todo => todo.id === event.detail.id);
    const updatedTodo = { ...todos[todoIndex], completed: !todos[todoIndex].completed};
    todos = [
        ...todos.slice(0, todoIndex),
        updatedTodo,
        ...todos.slice(todoIndex + 1),
    ];
}
The purpose of the handleDeleteTodo function is to delete a specific todo element from the array of todos. To todo item which should be deleted is determined via it's unique identifier which is received within the event object.
The purpose of the handleToggleComplete function is to change between the completed and non-completed state of a specific todo item. First the the array index of this element is retrieved by using it's unique identifier. Next a new todo object is created with the completed value changed. Finally a new array is assigned to todos containing the updated todo object replacing the old.
Component Styling
Finally let's also add some styling to Todos component:
<style>
    .container {
        max-width: 800px;
        margin: 10px auto;
    }
    .logo {
        display: block;
        margin: 20px auto;
        width: 50%;
    }
    .todo-input {
        width: 100%;
        padding: 10px, 20px;
        font-size: 18px;
        margin-bottom: 20px;
    }
    .inner-container {
        display: flex;
        align-items: center;
        justify-content: space-between;
        font-size: 16px;
        border-top: 1px solid lightgrey;
        padding-top: 15px;
        margin-bottom: 13px;
    }
    .inner-container-input {
        margin-right: 12px;
    }

    button {
        font-size: 14px;
        background-color: white;
        appearance: none;
    }

    button:hover {
        background: lightseagreen;
    }

    button:focus {
        outline: none;
    }

    .active {
        background: lightseagreen;
    }
</style>
Implementing TodoItem Component
For our second Svelte component, let's start by first adding the HTML template code into file TodoItem.svelte:
<div class="todo-item">
    <div class="todo-item-left" transition:fly="{{ y: 20, duration: 300 }}">
        <input type="checkbox" bind:checked={completed} on:change={toggleComplete}>
        <div class="todo-item-label" class:completed={completed}>{title}</div>
    </div>
    <div class="remove-item" on:click={deleteTodo}>
        ×
    </div>
</div>
The template code consists of:
- one top level div element containing everything else
- two child div elements
- the first child div element is used to output the checkbox input element which is used to set a todo item to completed and the title text of the todo element
- the second div element is used to output the x icon which is used to delete a todo element from the list
The template code is making use of several custom CSS classes which will be added to the component implementation later on.
Furthermore the a Svelte fly transition effect is used to animate the appearance of the todo item element in the liste by adding the following attribute to the div element:
transition:fly="{{ y: 20, duration: 300 }}"Next thing to notice is that we're binding event handler functions to the change event of the checkbox input element (toggleComplete) and to the click event of the x icon which is used to delete todo items (deleteTodo).
Therefore we need to make sure to add the following script section into the implementation of TodoItem component which contains the implementation of both event handler functions:
<script>
    import { createEventDispatcher } from 'svelte';
    import { fly } from 'svelte/transition';

    export let id;
    export let title;
    export let completed;

    const dispatch = createEventDispatcher();

    function deleteTodo() {
        dispatch('deleteTodo', {
            id: id
        });
    }

    function toggleComplete() {
        dispatch('toggleComplete', {
            id: id
        });
    }
</script>
Both functions, deleteTodo and toggleComplete, are being used to emit events from the TodoItem component, so that the parent component (Todos) is able to receive those events and attach event handler functions to those events.
Component Styling
Finally let's add the following CSS code to TodoItem.svelte:
<style>
    .todo-item {
        margin-bottom: 15px;
        display: flex;
        align-items: center;
        justify-content: space-between;
        animation-duration: 0.3s;
    }

    .remove-item {
        cursor: pointer;
        margin-left: 15px;
    }

    .remove-item:hover {
        color: lightseagreen;
    }

    .todo-item-left {
        display: flex;
        align-items: center;
    }

    .todo-item-label {
        border: 1px solid white;
        margin-left: 12px;
    }

    .completed {
        text-decoration: line-through;
        color: grey;
    }
</style>
Changing App.svelte
As the last implementation step, before we're stating up the web server, we need to include the output of Todos component in App component. Here you need to change the content of file App.svelte to the code which you can see in the following listing:
<script>
    import Todos from './Todos.svelte'
</script>

<Todos />
Running The Application
Now that everything is implemented let's start the development web server by using the following command in the project folder:
$ npm run dev
The Svelte compilation process is executed and the web server is started, so that you should be able to access the application by opening up URL http://localhost:5000 in the browser.
Building For Production
Once your project is ready for being deployed for production use you should run the following command to build an optimized version for that purpose:
$ npm run build
The output of the production build can then be found in the public subfolder of your project directory. The content can be uploaded to your web hosting service directly.
Summary
In this tutorial you've learned to build a real-world Svelte todo application from start to finish. By following the steps included in this guide you've learnt how to setup a Svelte application from scratch, creating custom Svelte components to structure your application, applying the Svelte concepts to implement the application logic and combining everything to build the final application.